
J.BF Story
[CSS] 가상요소 ::after ::before와 svg를 이용하여 요소 꾸며주기 (background) 본문
저번에는 svg를 ::after, ::before의 'content'로 표현하여 요소를 꾸며주었다.
[CSS] 가상요소 ::after ::before와 svg를 이용하여 요소 꾸며주기 (content url)
[CSS] 가상요소 ::after ::before와 svg를 이용하여 요소 꾸며주기 (content url)
가상요소 ::after, ::before에 'content'에 svg 이미지를 로드하여 요소를 꾸며줄 수 있다. 이렇게 구성하면 svg를 나 를 통해 따로 나타낼 필요없이 class만으로 표현이 가능하기 떄문에 관리하기 편하고
jbf-story.tistory.com
하지만 고정 크기를 가진 svg을 사용하여 작업했을 시 다음과 같은 문제가 발생했다.
- width, height를 설정해도 svg 이미지 크기는 변하지 않고 차지하는 공간만 커짐
- line-height로 svg가 차지하는 빈공간을 줄이는 것에 한계가 있음
- 스타일이 원하는대로 적용되지 않아 margin, padding을 이용한 위치 조정이 어려움
<style>
.related-link {
    display: flex;
    justify-content: center;
    width: 130px;
    text-decoration: none;
    color: black;
    border: 1px solid lightpink;
    border-radius: 4px;
    padding: 3px 5px;
}

.related-link::after {
    content: url("related-link-icon.svg");
    display: block;
    width: 20px;
    height: 20px;
    margin-top: 5px;
    margin-left: 9px;
    line-height: 20%;
    background-color: lightcyan;
}
</style>

<a class="related-link" href="https://www.naver.com/">Related Link</a>
위의 문제를 해결하기 위해서 svg를 다음과 같이 'background'를 사용하여 표현하였다.
'background'를 사용하면 고정 크기의 svg를 원하는 크기로 조절할 수 있다.
<style>
.related-link {
    display: flex;
    justify-content: center;
    width: 130px;
    text-decoration: none;
    color: black;
    border: 1px solid lightpink;
    border-radius: 4px;
    padding: 3px 5px;
}

.related-link::after {
    content: " ";
    background-image: url("related-link-icon.svg");
    background-size: cover;
    background-repeat: no-repeat;
    background-position: center;
    display: inline-block;

    width: 8px;
    height: 8px;
    margin-left: 7px;
    margin-top: 5px;
    background-color: lightcyan;
}
</style>
<a class="related-link" href="/test-page">Related Link</a>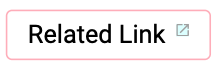
'FrontEnd > CSS' 카테고리의 다른 글
| [CSS] position 속성에 따른 요소 쌓임(z-index) 순서 (0) | 2022.07.12 |
|---|---|
| [CSS] 가상요소 ::after, ::before에서 사용한 svg에 대하여 width, height를 통한 크기 조정이 안되는 원인 (0) | 2022.07.11 |
| [CSS] 전체 요소에 font-family 적용하기 (0) | 2022.07.08 |
| [CSS] 고정 헤더에서 anchor 기능 사용 시 오프셋 설정 (0) | 2022.07.07 |
| [CSS] 가상요소 ::after ::before와 svg를 이용하여 요소 꾸며주기 (content url) (0) | 2022.07.06 |
'FrontEnd/CSS' Related Articles
more


Comments